Whatcha Makin' Now?: Whatcha Learnin' Now?

Pages

Showing posts with label Whatcha Learnin' Now?. Show all posts

Wednesday, March 26, 2014

Apps I'm Loving Right Now

I'm taking a little break from the kitchen this week. Don't worry, I'll have some sweets next week. So instead lets talk apps. Over the past few weeks I've discovered new apps that I had to share with you! Some are just fun and others can help keep you organized.

Here we go....

iMotionHD | Free | iPhone and iPad
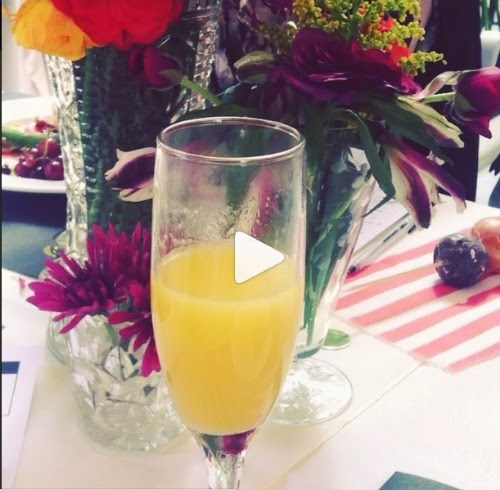
This free iPhone/iPad app lets you create time-lapse and stop-motion videos. You can edit to your liking and upload to social media and YouTube. I keep looking for reasons to use it....so fun. I tried it for the first time at the KC Blogger Brunch last weekend with my mimosa. I need more practice, but you get the idea. My friend, Laura of Simply Paperie, made one with delicious cake.


Wednesday, March 19, 2014

#WhatchaLearinNow: How to Know Your Shape and Dress for It

Since I'm hanging out in Nashville this week, my sweet sister is taking over my Whatcha Learin' Now post. I hope I'm not the only one, but I don't always know what looks best on me so I asked Ginny to share some tips. Take it away seeester!


Hi everyone!  I'm Ginny, Chelsea's sister, and I blog over at My New Favorite Outfit.  I blog about fun, affordable fashion. I also really enjoy creating how-to posts and recently finished a series focused on dressing for your shape.

Looking your best can be the best confidence boost and I believe that begins with knowing your shape and then working to dress for it.  I personally am rectangularly shaped, which basically means my waist has no definition.  As much as I would like to wear certain pinspired outfits, some just don't work for me due to my shape.  However, once I learned to dress for my shape I was able to create some great looks that left me feeling confident all day long.  For example, take a look at this collage:


The difference between the first and second picture is crazy!  Simply adding a layer and a scarf to draw the eye up and boots to draw the eye down, and I suddenly look much slimmer.

Not sure of your shape?  Check out this post for the qualities of each shape.  Then, check out the links to posts below to learn how to dress best for your shape.

The first type of started the series with was hourglass, see the full post here.

Wednesday, January 29, 2014

HTML to Create a "Grab My Button" Widget in Blogger

HTML to create you own Grab My Button widget in Blogger

My sister made a special request that I share directions for creating a "Grab My Button" widget. While it looks complicated, it's really simple! I have the HTML code ready, you just need to make a few little tweaks to include your information and you're done.

Here we go!

1. Create a blog button using PicMonkey or Photoshop. I recommend a square image that is at least 200 x 200. If the image background is white make sure to add a border to give the image some definition.


2. Upload the image to your blog. The image has to be uploaded so you can capture the image URL. Once uploaded, select the image and place in a blank blog post.

3. Click on the image to see the various options and select "Edit Link".

Wednesday, November 20, 2013

Record your screen with Jing, by TechSmith

Jing is a free software that allows uses to record images and videos of their screen and share.

It's Whatcha Learnin' Now time! If you're new to this series, I take a break from recipes and share techy tips. This week, I have to tell you about Jing by TechSmith.

Jing is a FREE web-based software that allows users to capture and share images and/or short videos of their computer screen. I use a few other TechSmith programs, Snagit and Camtasia, at my day job and love them so when I realized they offer a free software that would let me do the key things at home, I was thrilled.

I'm kinda a screenshot addict. I seriously send screenshots in emails at least twice a day, every day, if not more. Sometimes its just better to show something instead of trying to type out word-for-word. Outside of work, there have been a number of times a fellow blogger will ask how to do something that is just to hard to explain. Jing would allow you to take a screenshot and/or record your screen movements and then share that image/video with anyone.

Let's look at a couple examples...

I could use Jing to show my readers how easy it is to sign up for my weekly newsletter. Here's the quick video.

Or, maybe I want to remind readers where they can find my Recipe Index.


I can even capture my screen and add words and arrows.


Cool, huh!?! Oh, and I did buy that rug yesterday but more on that later. 

Wednesday, October 23, 2013

How to Install Conversion Box in Blogger

How to Install Conversion Box in Blogger - FREE tool to capture your blog readers and expose to your FB page!

I heard about Conversion Box from my Online BlogCon buddies. It's a great way to give your Facebook page more exposure in a reader-friendly way. Instead of an obnixous pop-up you have to close before doing anything else, a little message shows up in the lower right-hand corner of your screen when a reader scrolls down your blog page. Then, the reader can "like" your page right there - no page load, just a simple like!

So many times I hear of cool things like this that only work for Wordpress. I'm just not ready to make the move to Wordpress from Blogger. I've been very happy with Blogger and what it has to offer and, for me, it's perfect!

Blogger buddies! Conversion Box works for blogger. Yippy! And, it' will take you less than 5 minutes to add to your site.

Let's take a look at the steps...

How to Install Conversion Box to Your Blogger Blog

Wednesday, October 16, 2013

How to Use Dropbox to Share Printables and Other Documents

Step-by-step instructions showing how to use Dropbox to share files/printables on your blog. With screenshots of each step!

Printables are fun. Bloggers love to provide them to support a blog post or to offer something extra. I've used them to share a printable tag for my Russian Tea and for a HTML Cheat Sheet for a recent Whatcha Learnin' Now post.

There are a few different ways to share those documents with your readers. I'm a big Dropbox user and love the ease of use and sharing options.

Let's take a look at how you can use Dropbox to share printables and other documents on your blog:

Wednesday, October 9, 2013

Tips for Bloggers Who Work Other Full-time Jobs

Tips for Bloggers Who Work Other Full-time Jobs --- you CAN blog and work full time, and be successful!

Blogging becomes even a bigger passion of mine with each post I write. It's so refreshing to have a creative outlet and even serves as a way for me to relax. But a lot of us, like me, work full-time and blog in the evenings and on the weekends.

In this week's Whatcha Learnin' Now post, I thought it would be fun to share some tips for managing a blog while working full-time at another job.

1. Set goals. 
I can't lie, I'm not the best at setting goals but it is key. There will be days you'll be too tried to even look at your blog after a long work day. Keeping your eye on what you want to accomplish will give you the push to continue. Your goals should also include how many posts you want to do each week and how much time you will set aside to blog.

Wednesday, October 2, 2013

Why Food Bloggers Should Love Aldi

Why Food Bloggers Should Love Aldi - products to buy and tips for shopping!

I'm taking the Whatcha Leanin' Now out of the techy world this week to share with you why I love Aldi, and why YOU should too.

Wednesday, September 11, 2013

10 of My Favorite Blog Tutorials

10 MUST have resources for bloggers of any kind, new and experienced!

In the last month, I've stated at least 5 times that I'd like to redo my whole wedding because of all the cool ideas I've seen on blogs. Jake and I got married 5 years ago; that was before Pinterest people. All my ideas came from magazines, national wedding websites, or bridal fairs. We all know I'm not serious; I loved my wedding and would not change a single thing, but you get what I'm saying.

We have SO same amazing tutorials at our fingertips and Pinterest provides a nice way to find bloggers who have posted these resources!


Today, I'm going to share 10 blog related tutorials that really helped me. For even more, follow my Blogger Tip board on Pinterest! This is a group board so a number of bloggers are pinning articles, too!

1. How to Make an HTML Grab My Button from Code it Pretty

2. Search Engine Optimization for Bloggers from Bake Your Day: Post 1, Post 2, Post 3, Post 4, Post 5

Wednesday, September 4, 2013

How to Link Your Images to a URL in Blogger

When planning topics for my weekly Whatcha Learnin' Now posts I think back to questions that people have asked me. This is a quick little tip, but very helpful when you want to direct your readers to a particular post! You know all the recipe round-ups? You could link those images to the original blog post as another way to access the information!

How to Link Your Images to a URL in Blogger

In Compose view: 

1. Open a blog post and insert a picture.

2. Click on the image to view the toolbar of options for the image. Select the 'Edit Link' option.

How to Link Your Images to a URL in Blogger

3. A small window will open with a box asking 'To what URL should this link go?'.


4. Remove the link you see with the website URL you'd like the picture to link to. You can also opt to have the link "Open in a new window" and test the link from this screen!


5. Click "OK" and you're done! 


In HTML view:

1. While in 'Compose' view insert your image like normal. 

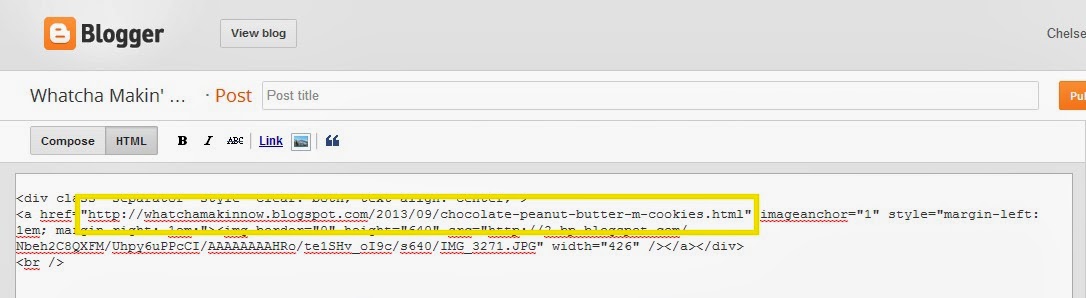
2. Click over to the 'HTML' tab to view the coding of the post. Look in the code for <a href=. This will show you the current URL and will always end in .jpg or .png because it's an image. 

{Click below image to view larger.}

3. Replace the image link with the website URL you'd like the image to link to. The link should be entered within like so: <a href="linkhere">  

{Click below image to view larger.}

4. If you'd like the image to open in a new window, add target="_blank". 

{Click below image to view larger.}

5. Click back to 'Compose' view and finish you post like normal! 


Want to learn more about HTML? Here's a printable cheat sheet for you!


Wednesday, August 28, 2013

5 Ways to Automate Your Social Media Posts

5 Ways to Automate Your Social Media Posts - Quick rundown or 5 different ways to automate your posts to save you time!


We all love social media, but sometimes there are just not enough hours in a day. Whether you blog full-time or work full-time, managing all of our channels and communicating with our followers can quickly take over our days. Today I'm sharing a few options for automating your social media posts.

A few things to note before we talk about automation...

  • Always make sure to review your channels and respond to comments, questions, or the things others post on your wall. The key to social media success is engagement and interaction!
  • As we talked about last week, try your best to NOT post the same content on every channel. Mix up your posts to keep your followers guessing what's coming next.
  • Test, track, and analysis your posting to see when is the best time for YOU to post to your followers.


Now onto a few options: 
  1. Buffer - bufferapp.com    {Basic account is FREE}
    • Basic service is free, upgraded account is $10.00 per month. 
    • Allows for scheduling of posts to Facebook, Twitter, LinkedIn, and App.net. 
    • According to their website, Google+ integration is coming soon! --> Updated! Google+ was JUST added today!!
    • So easy to use; there are extensions for Chrome, Firefox, and Safari making it super easy to snag and share blog posts and images you love as you're doing your daily reading. 
    • Provides basic analytics to help track engagement. 
    • The free services works for me, but if you are a contributor to multiple blogs or maintain many different Twitter, Facebook, and LinkedIn profiles the paid version would be worth it.
  2. Hootsuite - Hootsuite.com     {Basic account is FREE} 
    • Manage up to 5 social media profiles for free, Go Pro for $8.99 per month for additional profiles and accounts. 
    • Allows for scheduling of Facebook, Twitter, Google+, Foursquare, Wordpress, Mixi, and App Directory. 
    • Has an Auto Schedule feature to post at the optimal time for best exposure. 
    • Fairly easy to use, but the screen is a little more cluttered than Buffer.
  3. Facebook Scheduling     {FREE} 
    • Facebook allows for scheduling of posts right on your page! You can pick any date and time! 
    • The scheduling option is within the normal update box, bottom left-hand corner (see below). 
    • Scheduled posts show in your Activity Log within your page for editing until they are posted.
  4. Viraltag (formally Pingraphy)viraltag.com     {30 day free trial, and then a monthly fee} 
    • Allows for scheduling of pins for Pinterest.
    • 30 day free trial, after that option is $12 or $28 per month, depending on your plan. 
    • The $28/month plans does allow for up to 5 accounts; I've heard of bloggy friends joining forces and 'sharing' an account to cut down on the expense. 
    • I'd recommend trying the 30 day free trial and TEST, TRACKING, ANALYSIS your results. As a food blogger, Pinterest is a great tool for me and Viraltag might keep traffic coming your way while you are on vacation, working your day job, or juggling day to day tasks.
  5. Virtual Assistant    {Fee can vary based on services provided.} 
    • Maybe software isn't your thing and you'd rather hire someone to help with your social media channels! This is happening more and more! My recommendation would be to reach out to your fellow blogger friends and your network to gauge offerings, compensation, and overall set up. 

Thanks for stopping by and I hope you're enjoying my Whatcha Learnin' Now posts. And, sign up for my weekly newsletter so you don't miss a single thing!  :)

Wednesday, August 21, 2013

How to be a Better Blogger

How to be a Better Blogger - Tips, Advice, and Resources shared at a blogger conference!

I attended my first in-person blog conference in August, Go Blog Social. It was amazing. Not only did I get to learn from some talented bloggers, but I got to spend the weekend with my sister! My friend Helen was also there!

What's the point of me keeping all the good information to myself? No point. That's why I'm going to share some of tips I picked up over the weekend in this week's Whatcha Learnin' Now.

Your Brand...
Morgan and Carrie of Ampersand Design Studio shared information on creating your brand and making it your own. Think about these things:
  • What's your purpose?
  • What's your passion?
  • What are your goals?
  • Be the authentic you.
  • Emphasize what makes you unique.
  • Don't be afraid to have a style, a voice, an opinion. 
  • Don't try to be everything. 

Building your blog...
  • Always be yourself. This was said by almost every speaker because it's that important. Your readers will see it and you won't enjoy the process.
  • Ask other bloggers for their media kits to gauge rates and services offered. 
  • Focus on your content. If you don't feel good about a post, don't publish it.
  • Think far ahead. (I'm realllly bad about this.) Post about specific holidays a month or so in advance so readers find you when they search. 
  • If you want to write about a tough topic or touchy subject, write the post, keep it in draft for a few weeks. Then, go back and review, remove 50% of the content and publish.
  • Take your blog off line! Attend local functions and tell everyone you meet about your blog. You never know when someone might know someone who is looking for your skills. 
  • HAND-WRITE a thank you note to brands you work with, people you meet, etc. 
  • Buy your domain and an email to match so that others treat/view you as a business. 
  • Create a wish list of what others could help you with. That way when you meet people that want to help, you know what to say.

Social Media/SEO/Exposure...
  • Don't just share your blog posts on social media; mix up the content, always. 
  • There are a lot of times the same person follows you on each of your social media channels. Post different things on each channel so they don't see the same thing. 
  • Google (and other search engines) can see basic social media page information like number of likes. 
  • Bing and Yahoo usually copy what Google does. 
  • The more trustworthy you look, the higher your page rank. This is achieved by posting quality content, consistently, and the content all ties together. 
  • Make sure all of your channels are linked and always provide links to all your channels. 
  • If you're not sure if a link party is beneficial (or another activity), test, track, and then analysis before stopping. And, do this for a 6 or 8 weeks to REALLY see the results. 
  • Work your LinkedIn network and connect with brand representatives and other industry leaders. Treat this like another social media channel and post engaging contact your contacts will enjoy. 

Sponsored Posts...
  • When a brand offers you a free product, tell them upfront that you'd love to try the product but there is no guarantee you'll post on your blog or mention on social media. 
  • Treat sponsored posts as extra content from your standard posts since you are being compensated (or receiving something). Posts those IN ADDITION to your normal posts. I loved this idea because your readers will still get the normal posts but they will get a little extra too!
  • Want more sponsored posts? Connect with your favorite brands on social media, interact, develop a relationship, create a Pinterest board featuring their products, etc. 
  • Most of the time YOU have to reach out to the brands. 
  • Don't be afraid to approach a brand with a pitch outlining how you would like to work with them! 
  • Sometimes brands will ask you to do something that doesn't fit your style, blog, or audience. You don't have to just say no, but you could reply with what YOU think would be best for your blog and audience. These discussions could go on for months before you and the brand come to terms.
  • Don't be afraid to say NO! If the brand doesn't fit your readers, don't do it.  
  • Always make sure the relationship with the brand is mutually beneficial; they get content, you get exposure to their followers - you get paid, they get photos/content. 
  • Don't work for free; you ARE worth it! 

Blogger Resources...
  • Pinterest Board with just Blogger Tips
  • What the Font - Find out the names of fonts when you find them online. 
  • Lynda.com - Offers training for all sorts of things.
  • Blog Shop - Photoshop for bloggers workshop.
  • Etsy - Search "blog clip art" or "social media icons" for inexpensive graphics. 
  • Look for local designers, advertising companies, and other professionals when you have a blog need. So nice to meet those people in person! 

This was just a snapshot of the content covered (I'm not the best note taker) but I hope this will give you some things to think about. This conference just made me want to attend next year (duh) but also branch out and attend local events and other conferences.

To my fellow food bloggers, Jessica of How Sweet It Is was there! She shared great information about working with brands and I luckily was able to meet her and tell her how much I enjoy her blog. I felt like such a nerd; I was grinning from ear to ear and so nervous.


Some of the other speakers were Megan Davey, Emily Walters, Melanie Knople, Jeanette Scott, Meg Biram, Marcy Tweete, Mikita Burton, Tracie Fobes, Julie Blanner, Morgan Georgie, Carrie Kiefer, and Corrie McFadden. ALL were amazing! It was such a nice mix of backgrounds, blog topics, and expertise. Click here to see all of the speakers at Go Blog Social.

I hope you're enjoying my Whatcha Learin' Now posts. If you'd like me to cover a specific topic, don't be afraid to comment below or email me!

Tuesday, August 13, 2013

Basic HTML Cheat Sheet {FREE printable}

Basic HTML Cheat Sheet {FREE printable} -- HTML doesn't have to be scary! This is an easy to reference list with some of the most commonly used codes!

Programming note: I'm swapping my Tuesday and Wednesday post this week because tomorrow is my birthday. Check back tomorrow for lots of cake.... ;)

I know HTML is a dirty word for some of you, but it doesn't have to be!

In this edition of Whatcha Learnin' Now, we will review basic HTML to help eliminate some fear when you need to play around with HTML coding. 

Technology has made things pretty easy for bloggers in that we don't need to know HTML or web design to have a successful blog. Amen to that! But there are times when we want things to look a certain way and it. just. won't. happen. I'm hoping this cheat sheet will help you in those moments!


If the printable isn't your thing, here is a quick list of the codes I use most: 

Paragraphs
<p>This is a paragraph.</p>

Bold Text
<b>Creates bold text.</b>

Italic Text
<i>Creates italic text.</i>

Creating Headlines (adjust 1 to 6)
<hl>The largest headline.</hl>
<h6>The smallest headline.</h6>

Increase/Decrease Font Size (adjust 1 to 7)
<font size="3">This text would be size 3.</font>

Change Font Color (Use font color or hex value)
<font color="green">This text would be green.</font>

Change Text Alignment (Left, Right, or Center)
<p align="left">  OR  <p align="right"> OR <p align="center">

Change Image Alignment (Left, Right, Center, Bottom, Top, Middle)
<img src="this is your image link" align="left">

Insert a Break
<br>

Insert a Horizontal Rule (line)
<hr/>

Indent Text
<blockquote>Text to Indent.</blockquote>

Creating a Numbered List
<ol>
<li>item 1</li>
<li>item 2</li>
<li>item 3</li>
</ol>

Creating a Bulleted List
<ul>
<li>item 1</li>
<li>item 2</li>
<li>item 3</li>
</ul>

Creating a Link
<a href=”http://whatchamakinnow.com”>Check out my blog!</a>

Creating a Link to open in a new window
<a href=”http://whatchamakinnow.com” target="_blank">Check out my blog!</a>

Creating a Link to Email
<a href="mailto:whatchamakinnow@gmail.com">Email Me</a>

Adding a Link to an Image
<a href="link URL"><img src="this is your picture URL"> </a>

Creating a Table

  • When I’m working with a table, I usually keep the border=1 until I’m done. Then, if I don’t really want a border, I change the 1 to a 0 and there is no border! You could also put a higher number if you want a thicker border. 
  • Columns are <tr> </tr>
  • Rows are <td> </td>
Here is a 4 columns  x 5 rows sample: 
<table border="1">
  <tbody>
<tr>
    <td>1</td>
    <td>1</td>
    <td>1</td>
    <td>1</td>
  </tr>
<tr>
    <td>2</td>
    <td>2</td>
    <td>2</td>
    <td>2</td>
  </tr>
<tr>
    <td>3</td>
    <td>3</td>
    <td>3</td>
    <td>3</td>
  </tr>
<tr>
    <td>4</td>
    <td>4</td>
    <td>4</td>
    <td>4</td>
  </tr>
<tr>
    <td>4</td>
    <td>4</td>
    <td>4</td>
    <td>4</td>
  </tr>

</tbody></table>

Wednesday, August 7, 2013

How To Create Round Images in PicMonkey

Something you might not know about me is that I love teaching people people new things, especially when it involves technology. My day job is spent working with some of the coolest real estate agents. One-on-one and in a group setting, we cover a wide range of topics which pushes me to constantly learn new things.

I learned at Go Blog Social that I need to share my passions with my readers. I already share my passion for cooking and baking, but I've left out the passion for helping teach people new things. 

Thus a new weekly post, Whatcha Learnin' Now. Each Wednesday I'll teach you something new! It might be an iPad app to save you time, a cheat sheet for HTML, or adding something new to your blog. 

If you have ideas or something YOU would like to know, leave me a comment or send me an email

Today, I'm going to show you how to create round images in PicMonkey. I use PicMonkey for almost all of my photo editing and graphics and love it. I do pay for the additional features, but you DO NOT need the paid version to create the round images! This technique could be used to create profile pictures (like mine), recipe round ups, or images on collages...just to name a few.

FYI - PicMonkey did not ask me to put together this post, I just really love their service and wanted to share these tips with you! 

Let's get to it. 

How to Create Round Images in PicMonkey - great for recipe round ups, fun profile pictures, and perfect for collages!


How to Create Round Images in PicMonkey

1. Go to PicMonkey.com and choose the Edit a photo option. 

How to Create Round Images in PicMonkey - great for recipe round ups, fun profile pictures, and perfect for collages!

2. Open the picture you'd like to edit. 

3. Under Basic Edits, choose Crop. Crop your image into a square. Apply the changes. 

How to Create Round Images in PicMonkey - great for recipe round ups, fun profile pictures, and perfect for collages!

4. Now, move down to the Frames section. Choose the Rounded Corners option.

How to Create Round Images in PicMonkey - great for recipe round ups, fun profile pictures, and perfect for collages!

5. On the Corner Radius, move the bar as far right as it will go. The image will become a circle. Check the box to make Transparent Corners. Apply the changes. 

How to Create Round Images in PicMonkey - great for recipe round ups, fun profile pictures, and perfect for collages!

6. Now it's time to save your image. Click the save button above your image.

How to Create Round Images in PicMonkey - great for recipe round ups, fun profile pictures, and perfect for collages!

7. Make sure the file type is .png. This will keep the background transparent and keep the round image. The image is now saved as a perfect circle! 

How to Create Round Images in PicMonkey - great for recipe round ups, fun profile pictures, and perfect for collages!


There you have it! Again, I hope you enjoy my new Whatcha Learnin' Now posts and leave a comment if you have something you'd like me to show you how to do.