Phase 2: We touched up a few spots on the walls and painted
the ceiling. The ceiling was not
fun. I’m just thankful that Jacob did
the majority or it while I edged the ceiling and kept the paint tray full. In the end we used nearly 5 gallons of paint for the walls and ceiling.
Phase 3: Epoxy the floors. Initially we thought we would do ½ one day, ½ another, but with the weather being so nice we decide to buckle down and just do it. Plus, we had more room in our living room for the rest of our garage junk. Yes, that included the lawn mower and snow blower. I know…that’s weird… but it worked. And it would only be for a few days.
We were sooo happy with the Epoxy Kit
from Sherwin Williams. When we
bought the kit the Sherwin Williams employees gave us a play-by-play but the
kit came with very straight-forward instructions.
Here is a breakdown of the steps:
2. Clear out the garage.
Once you start you can’t walk on it for 24 hours.
3. Perform a water test. We dropped a little water on the garage floor to make sure there was not already a sealant on it. Well, it didn't soak right in, but it didn't roll right off. So we rolled the dice and proceeded.
4. Clean the floor. The
kit comes with a degreaser for easy cleaning.
We used a push broom to apply the cleaner, waited 20 minutes, and gave
it a good rinse with a hose. We let dry completely
and then checked for any missed spots. It was
so nice to walk on the clean floor with my bare feet; I never would have done
that before.
5. Roll on the Epoxy: The Epoxy comes in 2 containers - a resin
and a base paint. Once the 2 components
are combined it creates a glue like substance.
The instructions say you have 2 hours to apply so we had to move quick. I did the edging around the garage
floor and then Jacob started rolling. We
used the cool sprinkles (colored paint flakes) so we painted in 3 foot
sections. Once rolled, I got to do the sprinkling,
then more rolling, and more sprinkling. Once
again, Jacob takes the manly job and I get the fun job. He’s a keeper. We used 2 kits and it took us a little over 2
hours to do the whole floor.
We left the garage open for the rest of the day; the fumes
were pretty strong. It was dry to the
touch by bedtime, but the directions say 24 hour for foot traffic, 48 for
heavier traffic, and 72 hours before parking a car.
Takeaways / Advice for Others:
Clean the floor. Even if it’s not super dirty, it will help
the paint stick and the finished product will be worth it.
Don’t stress about small cracks. We had minor cracks that we filled, but once
the epoxy and sprinkles are down you really don’t notice those minor
flaws.
Invest in an extended pole for your paint roller, like this one. It’s worth it and will make
painting any room much easier on the body. (Especially helpful for painting the ceiling.)
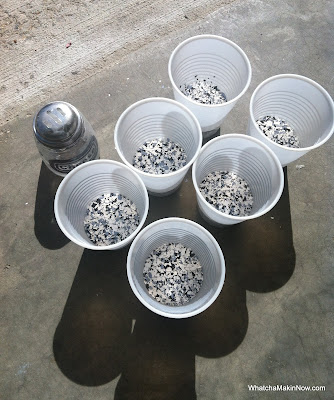
Separate the sprinkles into separate containers. This will help you keep the sprinkling even
and ensure you have enough for the whole floor.
We ended up having a lot leftover but you never really know until you
get started. I used a parmesan cheese
shaker (thankfully if did come clean afterwards) for my sprinkle application. Oh, I also used the ‘let it rain’ method for
those hard to reach spots.
Continue to stir the paint while working. This will keep the color consistent and
prevent it firming up.
We are absolutely thrilled with the floors! We both commented that the whole process was much easier than we thought it would be. This is, however, starting to feel like the project that never ends. After we finished the floors and walls the garage stairs looked horrible. And the raised storage area looked pretty crappy too. We have a few things planned to clean those up and then I can FINALLY share official after pictures.
I'm mostly looking forward to getting my living room back....looking at this everyday is getting a little old....


